

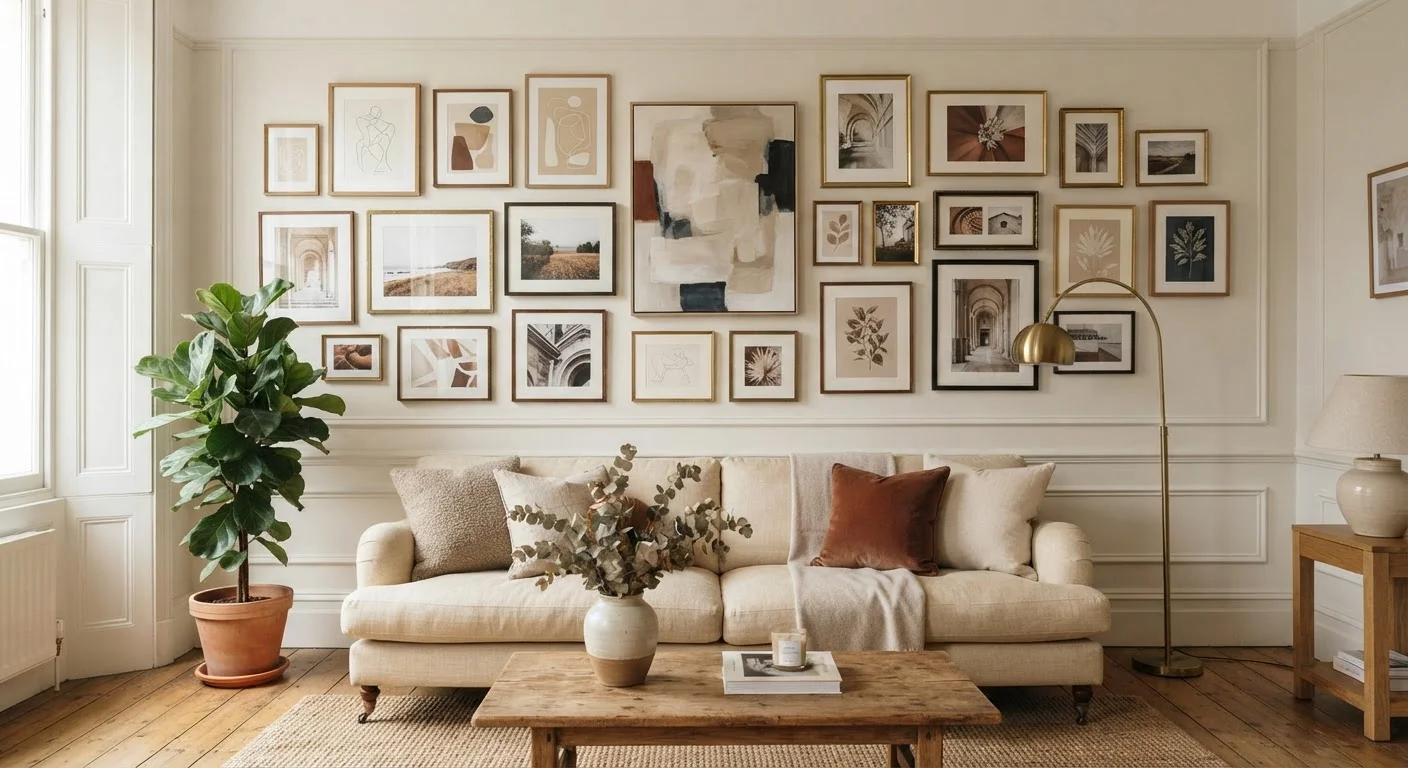
Key Takeaways
- Plan your entire layout on paper or the floor before driving a single nail into the wall.
- Maintain consistent spacing - 2 to 3 inches between frames - creates a cohesive, intentional look.
- A strong anchor piece, usually the largest or most dominant frame, should be positioned first.
- Mixing frame styles works best when unified by a consistent color palette or mat tone.
- Hanging strips and picture rails offer low-damage alternatives before committing to nails.
What you will need
Why Gallery Walls Fail - and How to Avoid It
Most gallery wall regrets trace back to the same source: decisions made one frame at a time, directly on the wall, without a plan. A nail goes in, a frame goes up, and suddenly the next frame has nowhere natural to go. The arrangement becomes reactive rather than designed.
The approach here flips that sequence. You'll make all the visual decisions before committing to the wall - then execute with confidence. This works whether you're arranging five frames above a console table or building a floor-to-ceiling statement in a hallway.
If your walls are freshly painted, you'll want to be sure the surface is fully ready. Proper paint prep and technique affects how well anchors and adhesive strips hold - and how visible any touch-ups will be later.
What you will need
What You'll Need
You don't need specialized tools, but having the right basics on hand saves significant frustration mid-project. A level is non-negotiable - skipped more often than any other tool and regretted every time.
Painter's tape
Outlines frame positions on the wall without damage, letting you preview your layout before committing.
Measuring tape
Ensures consistent spacing between frames and accurate centering on the wall.
Level
Keeps frames straight - even small tilts become obvious once artwork is on the wall.
Kraft paper or newspaper
Used to trace frame outlines for a full-scale floor layout before touching the wall.
Hammer and picture hooks
Standard hanging method for most frames on drywall.
Adhesive hanging strips
Low-damage alternative to nails, suitable for lighter frames on smooth surfaces.
Check for Wiring and Plumbing Before Nailing
Always use a stud finder with AC detection or a dedicated wire scanner before driving nails into walls - particularly in older homes. Electrical wiring hidden behind drywall can be at unpredictable heights. If you're uncertain, consult a licensed professional rather than guessing.
Step-by-Step: Planning and Hanging Your Gallery Wall
Photograph Your Floor Layout First
Before moving anything off the floor, take a photo of your final arrangement from directly above. This gives you a reference image you can consult at eye level while hanging - no need to keep crouching down to check your plan.
Gather and Sort Your Pieces
Collect every frame, print, and object you're considering. Lay them all on the floor in one place. Now edit: remove anything that doesn't fit your intended mood or color range. A gallery wall works best with 5 to 15 pieces - fewer can feel sparse, more can feel chaotic without careful planning.
Group your pieces loosely by size: large (your anchor pieces), medium, and small accent frames. This sorting step makes the next stages much easier.
Choose a Unifying Element
Mixed galleries look intentional when something ties the pieces together. That thread can be frame color (all black, all natural wood, all white), mat color, subject matter (botanicals, family photos, abstract prints), or simply a shared tonal palette in the artwork itself.
You don't need matching frames - but you do need at least one common thread that gives the eye a place to rest. Without it, the wall reads as clutter rather than curation.
Map the Layout on the Floor
Arrange your pieces on the floor in roughly the same footprint as your target wall section. Start by placing your largest or most visually dominant piece near the center or slightly above center - this is your anchor. Build outward from there, balancing visual weight rather than just size.
Keep spacing consistent: 2 to 3 inches between frames is the standard range. Tighter spacing (1.5 inches) feels formal and grid-like; looser spacing (4+ inches) can make the grouping feel disconnected. Decide which suits your room's tone. For rooms that already feel compact, visual scale decisions matter more than you might expect.
Transfer the Layout to the Wall Using Tape
Use painter's tape to outline each frame's position on the wall. Measure the actual outer dimensions of each frame and tape rectangles at the planned positions. Stand back and assess - this is your low-commitment preview. Adjust until the spacing and balance feel right at eye level.
Eye level for gallery walls is typically 57 to 60 inches from the floor to the visual center of the arrangement - the same standard used in most professional gallery spaces. If the wall is above a sofa or console, drop that center point to about 8 to 10 inches above the furniture's top surface.
Mark Hanging Points and Drive Your Hardware
For each frame, find the actual hanging point: measure from the top of the frame to where the wire or hook sits when taut. Subtract that distance from the top of your taped rectangle to find where the nail or hook actually goes. Mark lightly with pencil.
Use the correct hardware for your wall type - standard picture hooks for drywall, plaster anchors for older walls. For lighter frames (under 5 lbs), adhesive hanging strips are a reasonable low-damage option on smooth painted walls. Check the manufacturer's weight rating and surface requirements before using them. If your walls were recently painted, make sure the paint has fully cured - typically at least 30 days - before applying adhesive strips.
Hang Pieces Starting from the Anchor
Hang your anchor piece first, confirm it's level, then work outward - alternating sides to keep the visual weight balanced as you go. Use your level after each frame. Don't assume a frame is straight by eye alone; even a one-degree tilt is noticeable once the wall is complete.
Remove the painter's tape as you go to see the real result emerging. Step back frequently - at least 8 to 10 feet - to assess the full composition rather than individual placements.
Plaster Walls Require Different Anchors
Older homes with plaster walls don't grip standard picture nails the same way drywall does. Using the wrong fastener can crack the plaster or cause frames to fall. Use plaster-rated anchors and consider consulting a hardware professional if you're unsure what your walls are made of.
Making It Work in Any Room
Gallery walls aren't limited to living rooms. A tight cluster of three to five frames works well in a narrow hallway. A single horizontal row of matching frames suits a bedroom wall above a headboard. A staircase wall calls for a diagonal arrangement that follows the stair angle - typically with consistent spacing measured vertically and horizontally from each frame edge, not the stair line itself.
The same planning principles apply regardless of location: anchor piece first, consistent spacing, unified thread. For broader decorating context across your home, room-by-room decorating guidance can help you think through how each space functions and what kind of visual treatment suits it best.
If budget is a factor, gallery walls are actually one of the more affordable ways to make a significant visual impact - frames from thrift stores, printed artwork, and even personal photos can look polished when the layout is deliberate. Decorating on a budget is largely about placement and proportion, not price tags.